
Your No-Nonsense Guide To Guitar Setup
Before learning how to play your axe and blow people’s minds with your music, you need to make sure it’s in top condition first. Otherwise, you can play all you want, but you won’t sound your best without a little preparation.
Here’s a basic breakdown of what you need to do:
#1: Get New Strings
The first order of business is to ditch your old strings to make sure you won’t sound off or affect your setup. To find out if you need to replace your set, inspect under your strings (by running your fingers along the surface) and look out for signs of damage, such as:
– Oxidation/rust
– Excessive dirt
– Flat areas
For your new strings, it depends on what your needs are. If you’re looking to use a tremolo bar on your axe, there are strings designed for that purpose. They’re meant to move unrestricted and go back to its starting position inside the bridge block.
Of course, there are other kinds of strings available to suit your performance needs, so know what kind of guitar you have to match it with the right strings.
The next step is to break in your strings by giving them a little stretch after tuning it. A good way to stretch your strings is to hold them at the first fret. Then, give your strings a nice pull by hooking your finger under them individually.
You need to do this as you move your hand starting from the bridge, and then the neck. After a few cycles of tuning and stretching, that should get your strings up to speed.
#2: Get In Tune
If you’re using standard keys, you can first put the strings through the bridge and load them onto the keys. For standard keys, tie them in a knot in a clockwise pattern. It often takes three passes before tying your knot through the keyhole. You should be able to cut down on how many times you wind around the keys by the time you reach the last string.
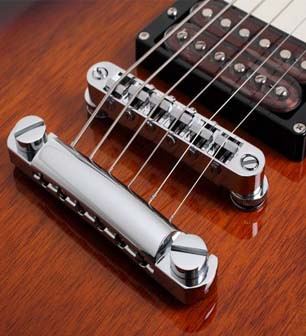
#3: Cleaning Up Your Act
It’s also a good idea to check the grooves in the nut if there’s any buildup of dirt left by the old strings. Clean them out with damp pieces of cotton or paper and put them through the slots individually while gently moving back and forth through them.
Be careful not to get any other parts of your guitar wet (like the fingerboard), especially if you’re using alcohol instead of water to clean the nut. You’ll find that cleaning the nut will help your tuning.
#4: Paying Attention to the Guitar Neck and Truss Rod
Once you have the new strings installed, you need to first adjust the neck relief, which basically means changing how much the neck bows. This all depends on your needs and how you play your axe – however, there is a general way to adjust the neck which you can fine tune later on.
If you’re dealing with a Fender model, the truss rod is probably at the neck or headstock, and Gibson models have a cover. So, you need to turn the adjustment bolt at the end of the truss rod.
For headstock type truss rods, you’ll want to use an allen wrench and a screwdriver for the neck joint type. Look for the edge of the fingerboard (which is right behind the headstock) as you’re facing the body of your axe.
The action might be too high, in which case you’ll need to turn clockwise to reduce the amount of relief. However, check if the strings are too near your fingerboard and turn them in the opposite direction. This will let the strings pull more relief in your guitar’s neck.
After this, re-tune your strings, then use a feeler gauge to check the gap to see if you have to adjust your neck relief again. Any change to the truss rod will usually change the tuning, so re-tune if you need to adjust the relief.
There are cases where you might find it too hard to adjust the truss rod (i.e. too much resistance). Likewise, turning it might not change anything at all. If any of these happen, have your guitar shop take a look to see what’s going on.
Click HERE to read the rest of the article…
Comments
Related Posts


You must be logged in to post a comment Login